Monday, January 30, 2012
WW Week 50 Update!
Can you believe we are only 2 weeks away from my weight watchers 1 year anniversary?! Crazy! This week I lost 1.4 pounds!!! YAY I'm finally losing again. With the weather warmer this week I hope to do some walking to help with that also.
Friday, January 27, 2012
52 Weeks To A Better Me - Week #4...Make Your Own...Granola!
This week I made my own granola cereal! It was great! We've already eaten the whole batch (and would've eaten more if I had enough ingredients to make more).
It's very easy to make and so customizeable! The recipe I used called for pecans, which we don't like so we left them out, and sunflower kernals which I put in, but will probably leave out next time.
This is the recipe I tried.
Honey Nut Granola
4c. Rolled Oats
1c. Sliced Almonds
1c. Chopped Pecans
1c. Raw Sunflower Seeds
1/3c. Canola Oil
1/2c. Honey
1 tsp Vanilla
1 tbsp Cinnamon
Mix together nuts and oats in a large bowl.

Mix wet ingredients, then pour over oats. Stir to evenly coat.
Spread granola on two cookie sheets. Bake in a preheated 300 degree oven for 10 minutes, stir then bake 10 minutes more or until golden.
It smells wonderful while baking and despite the cinnamon in it, it really isn't noticeable at all. We ate it on yogurt (vanilla and fruit flavored) and with milk and love it. This will definitely be our go to granola from now on. I will probably try to use 2 c almonds to replace the pecans and an extra cup of oats to replace the sunflower seeds next time.

Monday, January 23, 2012
WW Week 49!
This week I stayed pretty close to tracking everything I ate. When I weighed in I was exactly the same as the week before, even to the tenth of a pound! So I didn't lose anything but I didn't gain anything also!
Saturday, January 21, 2012
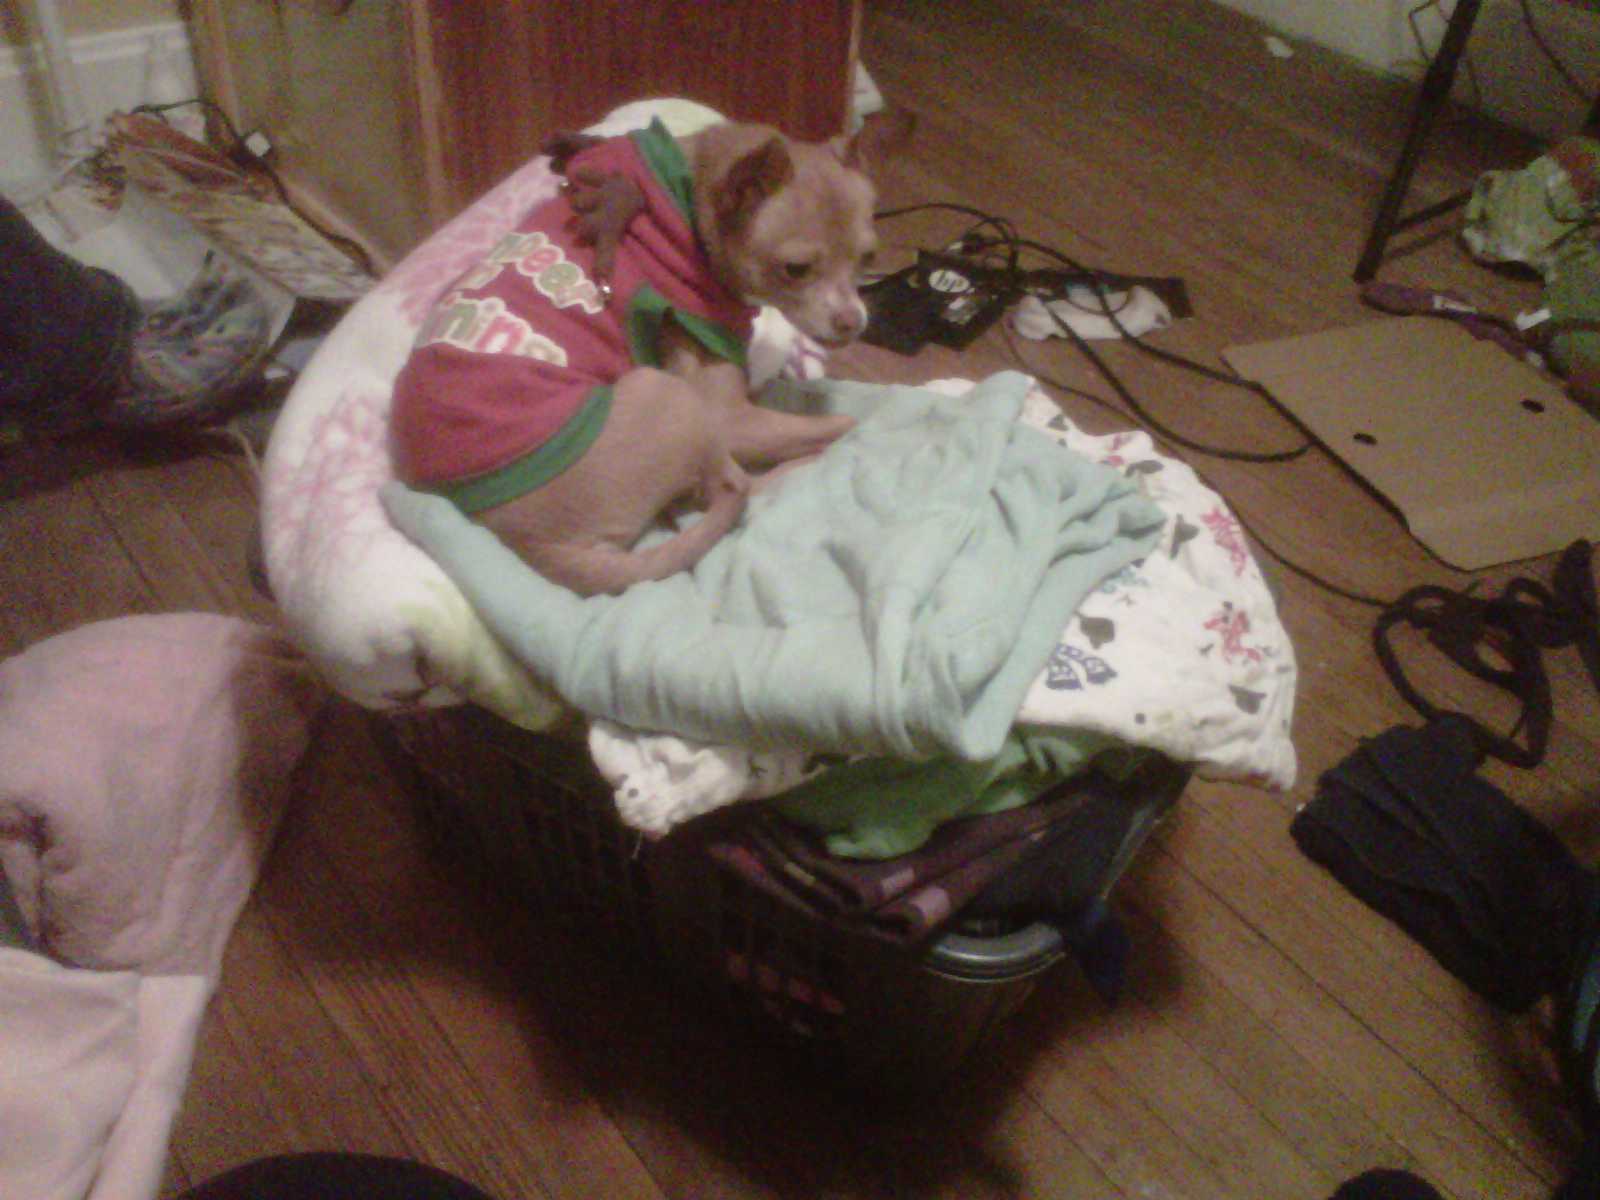
Pogo's Christmas Spirit
Pogo showed his Christmas spirit by sporting his "Reindeer In Training" hoodie. It has antlers on the hood with bells on the ends of the antlers.


 |
| He thought the most comfy spot to sit was on my basket of freshly folded clean clothes. |


Friday, January 20, 2012
200th Post!!! 52 Weeks To A Better Me - Week #3 /Make Your Own...Beeswax Lotion!
This is my 200th post!!!!
I recently made some beeswax lotion. It was super easy! It's a very thick "salve" type of lotion. Several comments about it said it helped with their eczema, I'm hoping it will help with the few patches I have. I made some for my sister, and roommates too.
 Beeswax Lotion
1 c. Olive Oil
1/2 c. Coconut Oil
1/2 c. Beeswax (I used the pastilles, they are easier to melt and measure)
1/2 tsp Vitamin E Oil (about 5 capsules cut open and squeezed out)(optional)
20 drops Essential Oil (optional)
Mix Olive Oil, Coconut Oil, and Beeswax in a pint canning jar. Put this jar in a saucepan and put water in the saucepan until it comes 3/4 of the way up the jar, being very careful not to get water into the lotion. Heat on low/medium heat until all the wax melts, stirring occasionally. Once melted remove jar and set on the counter to cool, stirring every 10-15 minutes or so with a fork. Once the lotion has cooled to room temperature, add the vitamin E oil and essential oils. I used white beeswax pastilles, so if you use the natural yellowish ones your lotion will be a little darker. It does leave a greasy feeling right at first, but that quickly soaks in. If you'd like to make it thinner, just leave a tbsp or so of the beeswax out of the lotion. I've also read that you can cut down on some of the greasiness by adding 2-3tsp of cornstarch when you add the vitamin E oil and essential oil. I made the recipe exactly as written (minus the essential oils as I didn't have any). I may try to play around with it in the future, if I do I'll definitely let you know the outcome.
My roommates and I have been using the lotion all week now. My skin felt noticeably better the first morning after I applied the lotion the night before. I've been applying it each night before I go to bed. It is quite thick and greasy feeling when you first put it on. I found the greasiness absorbed fairly quickly on my hands and took a bit longer on the rest of me to soak in. Putting it on right before I go to bed helps to "mask" the greasiness, because it has already absorbed by the next morning. It has seemed to help my eczema patches, they feel smoother and are not as red. I would definitely make this again to use as a nightly body cream, however it's not really something you would use as a hand lotion. I found that when I reapplied it to my hands repeatedly it made them feel filmy or "dry" it was weird. My hands feel fine each night when I slather the lotion all over me before bed though. My roommates also said their skin felt much smoother and not as dry after using the lotion for just a few days.
I recently made some beeswax lotion. It was super easy! It's a very thick "salve" type of lotion. Several comments about it said it helped with their eczema, I'm hoping it will help with the few patches I have. I made some for my sister, and roommates too.

1 c. Olive Oil
1/2 c. Coconut Oil
1/2 c. Beeswax (I used the pastilles, they are easier to melt and measure)
1/2 tsp Vitamin E Oil (about 5 capsules cut open and squeezed out)(optional)
20 drops Essential Oil (optional)
Mix Olive Oil, Coconut Oil, and Beeswax in a pint canning jar. Put this jar in a saucepan and put water in the saucepan until it comes 3/4 of the way up the jar, being very careful not to get water into the lotion. Heat on low/medium heat until all the wax melts, stirring occasionally. Once melted remove jar and set on the counter to cool, stirring every 10-15 minutes or so with a fork. Once the lotion has cooled to room temperature, add the vitamin E oil and essential oils. I used white beeswax pastilles, so if you use the natural yellowish ones your lotion will be a little darker. It does leave a greasy feeling right at first, but that quickly soaks in. If you'd like to make it thinner, just leave a tbsp or so of the beeswax out of the lotion. I've also read that you can cut down on some of the greasiness by adding 2-3tsp of cornstarch when you add the vitamin E oil and essential oil. I made the recipe exactly as written (minus the essential oils as I didn't have any). I may try to play around with it in the future, if I do I'll definitely let you know the outcome.
My roommates and I have been using the lotion all week now. My skin felt noticeably better the first morning after I applied the lotion the night before. I've been applying it each night before I go to bed. It is quite thick and greasy feeling when you first put it on. I found the greasiness absorbed fairly quickly on my hands and took a bit longer on the rest of me to soak in. Putting it on right before I go to bed helps to "mask" the greasiness, because it has already absorbed by the next morning. It has seemed to help my eczema patches, they feel smoother and are not as red. I would definitely make this again to use as a nightly body cream, however it's not really something you would use as a hand lotion. I found that when I reapplied it to my hands repeatedly it made them feel filmy or "dry" it was weird. My hands feel fine each night when I slather the lotion all over me before bed though. My roommates also said their skin felt much smoother and not as dry after using the lotion for just a few days.
Monday, January 16, 2012
WW Week 48 Update!
This week I gained 1 pound. Ick. Oh well it's a new week, so I'm going to focus on making this next week the best it can be and hope for a loss!
Friday, January 13, 2012
Frugal Friday...Exfoliating/Moisturizing "Mud" Scrub
Every winter my skin gets even drier than it's already very dry state. I used to pay over $5 a bottle for that "in-shower" body lotion that you use after your body wash. It seemed to be the only thing that worked to remotely control my dry skin. Buying a bottle a month of that really adds up, plus I'm not exactly thrilled with putting all of those chemicals on my skin. That's why I love sugar scrubs! They exfoliate, moisturize, are 100 % natural, are very inexpensive and can be made in a variety of scents. You may remember my first sugar scrub, I've been out of that for quite awhile and the winter is really starting to take it's toll on my skin. I was very excited when I came across another sugar scrub recipe to make. It looks like mud, hence the name.
 "Mud" Scrub
1 C. Sugar
5 Tbsp Coffee Grounds
1/4 C. Oil*
1 tsp Peppermint Extract**
1 tsp Vanilla Extract
Mix the sugar and coffee. Add oil to coat the dry ingredients, then add extracts.
*I made it at first with 1/4c oil and found that after the first day it was too dry, so I added more oil. You can add oil or sugar/coffee to make it more or less dry.
**I didn't have peppermint extract so I just used vanilla.
Just rub a bit over your body while your in the shower and rinse. I use mine after my body wash, right before I get out and pat dry, so I don't rub off all the oil. Try not get water in mix as the mix of oil and water will spoil.
This smells so good first thing in the morning!
Tuesday, January 10, 2012
52 Weeks To A Better Me - Week #2...Cleaning Schedule
This week's project is a Cleaning Schedule/Routine! If you know me in person you know that cleaning is not one of my favorite things to do. Since it's low on my totem pole of fun, I usually put it off until the room is disastrous and overwhelming, the problem with this is that when I finally do get to cleaning it's a huge job that I dread even more. My solution: A Cleaning Schedule. I've broken it down into Daily tasks with Weekly and Monthly zones. Now that I have a plan and outline, I'm actually excited to get started with it! I can hardly believe those words came from my brain! I really think that by staying on top of it, everything will seem like less of a chore.
My schedule overview is based on zones. Each day I do everything on my daily list, and focus on the "zone of the Day" and each week focus on the "Zone of the Week" They follow the same order 1. Kitchen/Dining; 2.Living Room/Foyer; 3. Laundry Room/Closets; 4. Bedroom/Bathroom; 5. Upstairs/Office. For the Daily Zone I just complete all the tasks for the day working until everything is done off my list. For the weekly zone I work 15-30 minutes each day to complete 1 or 2 tasks on my weekly list.
This is the detailed list of tasks:
I. Daily
A. Each Morning
1. Start (and complete throughout the day) 1 load of laundry
2. Make Bed
B. Before Bed
1. Kitchen
a. Have an empty sink & Clean dishes
b. Wipe off counters
c. Fill water pitchers
d. Set out fresh towel & dish cloth
2. Living Room
a. Fold blankets
b. Put away couch table
c. Pick up shoes
d. Straighten Pogo's toys
3. Bathroom
a. Clear off counter
b. Gather towels & washcloths for laundry
c. Set out a fresh hand towel
4. Bedroom
a. Put away clean laundry
II. Weekly
A. Monday
1. Kitchen/Dining Area
a. Sweep & Mop Floors
b. Empty Fridge
c. Clean microwave
d. Clean garbage disposal
e. Take out trash
B. Tuesday
1. Living Room
a. Wash Blankets
b. Sweep & Mop Floors
c. Put Away Coats
d. Straighten Entertainment Center
C. Wednesday
1. Laundry Room
a. Sweep & Mop floors
b. Take out laundry trash if needed
c. Straighten laundry supplies
d. Check (and clean if needed) Turtles
2. Closets
a. Straighten
D. Thursday
1. Bedroom
a. Change Sheets
b. Sweep & Mop Floors
c. Empty Trash
d. Put away any clutter
2. Bathroom
a. Sweep & Mop Floors
b. Clean Tub & Shower
c. Clean Toilet
d. Clean Sink
e. Wipe Mirrors
f. Empty Trash
E. Friday
1. Upstairs
a. Straighten Pogo's Toys
b. Fold Blankets
c. Straighten "areas"
d. Vacuum Carpet
2. Office
a. Empty Trash
b. Empty Shredder
c. File Papers
d. Clear Desk
III. Monthly - 15-30 minutes each day
A. Week One
1. Kitchen/Dining Area
a. Clean Oven & Stove
b. Wash Rugs
c. Straighten Cabinets
d. Clean Dishwasher
e. Wash Windows
B. Week Two
1. Living Room
a. Dust
b. Wash Pogo's Blankets/Toys/Clothes
c. Wash Windows
d. Dust Ceiling Fan
2. Foyer
a. Wash Windows
b. Dust Cabinet
C. Week Three
1. Laundry Room
a. Refill Detergents
b. Take Inventory
c. Wash Windows
d. Dust Ceiling Fan
2. Closets
a. Straighten
b. Take inventory if needed
D. Week Four
1. Bedrooms
a. Wash Comforter
b. Wash Windows
c. Straighten Closet
d. Dust Ceiling Fan
2. Bathroom
a. Wash Shower Curtain
b. Straighten Cabinet
c. Wash Rug
d. Drain Cleaner
E. Week Five
1. Upstairs
a. Dust Ceiling Fan
b. Wash Windows
c. Wash Blankets
d. Sweep Steps
2. Office
a. Straighten Shelves
b. Clean Desk
Obviously, this list may not include everything and if something needs done that's not in the daily or weekly zone I will go ahead and do it. Hopefully this schedule should help me stay on top of everything to make it less of a chore each time.
What is your cleaning routine like?
Monday, January 9, 2012
WW Week 47 Update!
I've gained 8lbs since my last weigh in a month ago. EEEK! I expected it, not tracking and eating horribly will do that. Starting today I am getting back on track. Hopefully I can get back to where I was quickly so I can start to lose new pounds.
Friday, January 6, 2012
52 Weeks To A Better Me -Week #1/Frugal Friday...Make Your Own Make-Up Remover Wipes!
This is my first goal/project. I recently came across a tutorial to make your own Make-Up remover wipes. I love those they are so much more convenient than using face wash when it comes to removing make up. I prefer to use wipes to take off my makeup at night and to use regular face wash in the morning. So when I saw the tutorial I was very excited, you know me I love to make anything most people would buy and especially if it turns out cheaper and better than I could buy.
You need 4 simple ingredients: a container, paper towels, coconut oil, and water.
Coconut oil can be eaten, used as a butter substitute, massage oil, has natural antibiotic properties. It is used in several natural health and beauty product recipes that I want to try.
I used the container from my store bought face wipes.
Step 1. Cut a roll of paper towel to fit your container. Since the face wipe container is short I only used 1/4 of the roll. It is important to use a NON-SERRATED knife to cut the paper towels, unfortunately I didn't see that note until after I had cut my towels so I had a lot of extra fluff come off my roll. Using a straight edged knife to cut my roll would have eliminated that.

Step 2. Mix 4c of warm water and 2 tbsp of coconut oil(if making the whole roll's worth into wipes) I just made 1/4 of a batch (although I forgot to cut the coconut oil in fourths instead of halves so my batch has twice the liquid, I'll let you know how it turns out). Coconut oil has a really high melting point so it's solid like shortening or butter. I put tap water and the solid coconut oil in a microwave safe dish and microwaved it in 30 second increments until the oil was melted.

Step 3. Pour the liquid over the towels in the container.

Step 4. Let it sit at least 5 minutes. The cardboard tube will separate from the towels and will be easy to pull out.

Step 5. Grab the towels from the center of the roll and pull up. Since my container has a pop open lid I just shoved the towel through the hole. When you need one you just have to tear it off.

 The tutorial said to use the select a size towels and that's what I had anyway, but I think regular would work just as well.
They are easy to make, but are they cost effective?
I was able to find all my ingredients at Walmart. Of course I had the container at home, but really any type of plastic container would work.
The coconut oil I got cost $10.
The paper towels I used are VIVA 6 pack of Giant Rolls at Walmart they are $7.62(online).
I calculated how many batches you could make if you only used the ingredients to make the face wipes. Surprisingly the amount of towels I have and the container of coconut oil I got equal out almost perfectly if I were using them solely for this purpose so it was easy to calculate the price per wipe.
Each roll of paper towels has 100 wipes, cut the roll into 4 pieces and you get 400 wipes. Six rolls equals 24 batches making a total of 2400 wipes. The cheapest make-up remover wipes I found at Walmart were the Equate brand. You can get a 2 pack of 120 wipes total for $5.97.
If you buy the Equate wipes the price per wipe is $0.05/wipe, which is not bad at all really. The homemade wipes are less than $0.01/wipe! Not only are they cost effective, but they are better for your skin.
I just started using them, but love them so far. I'll let you know in my monthly recap how they work long term.
You need 4 simple ingredients: a container, paper towels, coconut oil, and water.
Coconut oil can be eaten, used as a butter substitute, massage oil, has natural antibiotic properties. It is used in several natural health and beauty product recipes that I want to try.
I used the container from my store bought face wipes.
Step 1. Cut a roll of paper towel to fit your container. Since the face wipe container is short I only used 1/4 of the roll. It is important to use a NON-SERRATED knife to cut the paper towels, unfortunately I didn't see that note until after I had cut my towels so I had a lot of extra fluff come off my roll. Using a straight edged knife to cut my roll would have eliminated that.

Step 2. Mix 4c of warm water and 2 tbsp of coconut oil(if making the whole roll's worth into wipes) I just made 1/4 of a batch (although I forgot to cut the coconut oil in fourths instead of halves so my batch has twice the liquid, I'll let you know how it turns out). Coconut oil has a really high melting point so it's solid like shortening or butter. I put tap water and the solid coconut oil in a microwave safe dish and microwaved it in 30 second increments until the oil was melted.

Step 3. Pour the liquid over the towels in the container.

Step 4. Let it sit at least 5 minutes. The cardboard tube will separate from the towels and will be easy to pull out.

Step 5. Grab the towels from the center of the roll and pull up. Since my container has a pop open lid I just shoved the towel through the hole. When you need one you just have to tear it off.


They are easy to make, but are they cost effective?
I was able to find all my ingredients at Walmart. Of course I had the container at home, but really any type of plastic container would work.
The coconut oil I got cost $10.
The paper towels I used are VIVA 6 pack of Giant Rolls at Walmart they are $7.62(online).
I calculated how many batches you could make if you only used the ingredients to make the face wipes. Surprisingly the amount of towels I have and the container of coconut oil I got equal out almost perfectly if I were using them solely for this purpose so it was easy to calculate the price per wipe.
Each roll of paper towels has 100 wipes, cut the roll into 4 pieces and you get 400 wipes. Six rolls equals 24 batches making a total of 2400 wipes. The cheapest make-up remover wipes I found at Walmart were the Equate brand. You can get a 2 pack of 120 wipes total for $5.97.
If you buy the Equate wipes the price per wipe is $0.05/wipe, which is not bad at all really. The homemade wipes are less than $0.01/wipe! Not only are they cost effective, but they are better for your skin.
I just started using them, but love them so far. I'll let you know in my monthly recap how they work long term.
Thursday, January 5, 2012
52 Weeks To A Better Me!
This year instead of a New Year's Resolution I've compiled a list of 52 Goals to better myself one for each week of the year. Some of them are recipes for food staple items that I'd like to start making instead of buying, some are ways to improve the environment/home/products I use, and some are just personal improvement types of things. Each week I will share with you my goal for the week and then monthly do a recap of how things are continuing to go. Look for my first "project/goal" tomorrow.
Wednesday, January 4, 2012
What's up with Weight Watchers?
So you may be wondering what's going on with my weight watchers plan lately. I took a break over the holidays on counting points and I know I've gained at least 10 pounds back. My plan is to start back fresh on Monday morning. So on Monday I will weigh in and "start new" I'm not sure what I will do as far as counting weeks, do I start over with week 1 for the year or continue the weeks from when I started it last year? Anyone have any ideas or suggestions?
Sunday, January 1, 2012

Subscribe to:
Posts (Atom)