Here's a peak into what I've been reading recently....
*"Abandoned by his fiancée hours before their wedding, Walker McKay is determined to never let a woman near his heart again, but he needs an heir to inherit his ranch after he is gone. Courting someone new is out of the question, so he'll have to find a wife another way.
Wealthy heiress Sara Livingston wants to be married, but her suitors are deemed unsuitable by her unreasonable father. When the opportunity to fill the bill for a mail-order bride comes her way, she grabs onto it with both hands.
Will Sara's deception and Walker's wounded heart keep them from finding what they are looking for? Or are they truly meant for one another?"
This was an easy read for me I started it Monday afternoon and was able to finish it Monday night. While searching for the photo of this book I found out it is the 3rd in a series. I was not at all lost in the storyline so perhaps they are stand alones within a series. I will definately check out the other two!
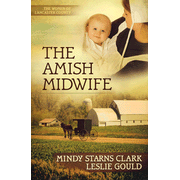
*"A carved box with two locks of hair, the title to property in Switzerland, and a burning desire to learn about her biological family lead nurse midwife Lexie Jaeger from Oregon to Pennsylvania. There Lexie pledges to help her biological Aunt Melia, a lay midwife who has been charged with manslaughter after an Amish client and her baby die. Lexie always knew she was adopted, and when she finally meets her birth grandmother, she feels she has come home-until secrets begin to unravel.secrets that could tear her birth family apart.
Lexie learns the true meaning of the Pennsylvania Dutch word demut, which means "to let be" as she changes from a woman who wants to control everything to a woman who depends on God."
I started this book Tuesday night after I had put the boys I was babysitting to bed and finished it this afternoon between my morning job and evening job. It was definately not your typical "amish" book. I loved that it was filled with mystery but not at all frightening or scary! It also isn't your usual fall in love, get married, live happily ever after story line, I would say the main focus is on forgiveness and letting things go. It is definately a must read and good for my spirit.

*"150 nutrient-packed recipes: Pizza, pasta, sandwiches, desserts, and dozens of other kid favorites.
Ask the experts: A special section for parents that includes hints for increasing—without objection—and for improving your child's physical fitness and self esteem.
Quick recipes for main dishes, sides, snacks, salads, and desserts use off-the-shelf ingredients.
Complete nutrition information with every recipe including carbohydrate guidelines and exchanges appropriate for diabetic meal planning.
No-guilt party food for any occasion."
I picked up this book looking for ideas to make foods healthier and fit more easily into my Weight Watchers plans. I am only part way through but have already jotted down some recipe ideas to try. I will definately let you know how they turn out!

*"Just because you're watching your waistline doesn't mean you need to go hungry. Recipes from Hungry Girl--like the Fiber-Fried Chicken Strips featured below--feed your every craving without piling on the calories. What's more, Lisa Lillien's lighthearted love for food and fun shines through in every recipe, making it easy to follow her healthy example and even come up with your own simple calorie-saving shortcuts. "
I have finished going this book and found a ton of recipes I'd like to try. Most of them are for 1 or 2 servings which is great since I'm doing this on my own! Again I will let you know how they turn out!
*"Tori Sanderson has the professional opportunity of a lifetime. If she can prove she's executive material, she's in line for a big promotion. But there's only room for one new account executive, and her co-worker has his eye on the job--and on Tori. Her matchmaking sisters have a handsome handyman in mind for her. But how can she consider romance when she couldn't hold on to the one man who was supposed to love her forever--her own father? The time has come for answers, and Tori decides to search out the father who deserted her twelve years ago. While Tori may find the answers she craves, will she ever be able to love again? A heartwarming story of sisters, retail therapy, and love that endures, Third Time's a Charm is the satisfying conclusion to Virginia Smith's SISTER-TO-SISTER series"
This is a book I started a long time ago and then got interrupted and just picked it back up. This is the third in the SISTER-TO-SISTER series by Virginia Smith. I've read and enjoyed the other two!
Any of you read any good books? Have you read any of these? Please let me know if you do/have! Tell me what you thought!
*DISCLAIMER: The descriptions in italics and quotations are not my own words.
Wednesday, March 30, 2011
Tuesday, March 29, 2011
WW Week 6 Update
This week I gained 3 lbs. I was kind of expecting it, as I went out of town for a baby shower and to spend the weekend with a friend. I had decided I would have a "no points" weekend and see how it worked. Well, it certainly didn't work in the weight "loss" area, but now I know. This week I hope to lose what I gained and get back to my 5lb total, so I can start fresh the next week.
Friday, March 25, 2011
Frugal Friday - Homemade Lemon Sugar Scrub
Today's edition of Frugal Friday features a Homemade Lemon Sugar Scrub I made last weekend and have been using all week! I found this recipe on www.TipNut.com. The recipe is so simple you cannot mess it up and it leaves your skin feeling so soft! You can pay good money for similar products, but why when you can make it for pennies?! There are other recipes and I plan to try them also so if you like the whole sugar scrub experience stay tuned! Ok that's enough yakking on to the recipe...
Lemon Sugar Scrub
1 cup granulated white sugar(I used brown sugar because it was all I had)
1/2 cup olive oil
1 Tbsp Lemon Zest
Simply mix everything together. I did find it to be very oily and ended up adding about twice the amount of sugar. Not sure if that had anything to do with using brown sugar instead of white or not. I did think the brown sugar gave it kind of a darker scent and the white sugar would be much lighter! I do intend to make it with white sugar next time.
Now that you know how to make it you need to know how to use it. Just scoop some onto your hands and rub together for several seconds, before rinsing with water. Pat dry and enjoy the soft feel of your skin. I have been taking this into the shower or bath with me and scooping out about 2 Tbsp and rubbing it over my whole body and then rinsing as an all over exfoliating moisturizer! Just make sure you don't get water into the unused portion as that could lead to bacteria growth!
This recipe doesn't really have a very long shelf life, it only lasts a few weeks. So its best to make small batches more often rather than a large batch. I ended up splitting the recipe with a friend and with using it all week still have plenty left. When I do run out I plan to try a different recipe and I'll let you know how and what it is. If you have any recipes you like please share them with me, I'd love to try them out!
Happy Scrubbing!
Tuesday, March 22, 2011
Britt's Knits -N- More Easter Edition
Here are some Easter decorations I made for my desk at work! They are pretty cute, if I do say so myself!
The eggs are individual and come out of the basket and the basket has a handle which I tucked into the basket!
Labels:
Britt's Knits -n- More,
Crochet,
Decorations,
Easter
Monday, March 21, 2011
WW Week 5 Update!
I lost 1 lb this week! I'm so excited that after a month I'm still losing. I have never had this kind of success on other plans I've tried, even when I was on Weight Watchers before! I'm perfectly happy with a 1 lb weight loss, considering I ate a subway sandwich this weekend that was only 5 points shy of my whole days allotment!
Saturday, March 19, 2011
Friday, March 18, 2011
Frugal Friday-Homemade Face Wash
I came across a recipe for homemade face wash on Money Saving Mom. It uses the Oil Cleansing Method I had not heard of that before yesterday but it looked intriguing. Basically store bought face washes completely strip your skin of all oils, which either completely dries it out or makes your skin produce way too much oil to compensate making you wash it more often. That makes the problem worse rather than better. Personally my skin is extremely dry, so much that I have red scaly patches that don't go away until humid summer time, no matter how much moisturizer I use. When I do put on moisturizer it burns my skin because of the dryness. There were several comments of people that had tried it and loved it, so I thought I would give it a try too! It's made up of two simple ingredients: Olive or Sunflower oil and Castor oil. I used Olive oil because that's what I had. You just mix different proportions depending on your skin type.
OILY: 3 parts Caster oil to 1 part Olive oil
NORMAL: 1 part Caster oil to 1 part Olive oil
DRY: 1 part Caster oil to 3 parts Olive oil
The Caster oil has cleansing and purifying properties in it.
I made some last night I used 1 tsp Caster oil to 1 Tbsp Olive oil and just filled a travel size bottle and shook it up together, so easy.
To Use:
1. Pour a quarter-size amount on your palm, rub your hands together, and slowly massage your face with your finger tips. Do not splash your face with water first, put it on your dry face. Work it into your face for about a minute. Don't scrub, just rub.
2.Wet a soft washcloth with hot water, (but not scalding), and put it over your face for about 1 minute or until it feels cool on your face.
3. Rinse and wring the washcloth and gently wipe off the oil.
I did it last night in the shower. It was very relaxing. My face felt a little oily right when i got out of the shower but with in 10 minutes, if even that, it just felt very smooth. Usually my face feels very tight and almost irritated from dryness after I shower, last night it felt refreshed and soft. I went to bed right away and when I woke up this morning I could immediately feel and see a difference in my skin. It is so soft and smooth and my dry patches are probably 50% better after just one use! I am totally sold on this and it's so economical to make! It cost me $5 for all the ingredients including the bottle to put it in! I love that its made from natural non-toxic ingredients, makes a lot for little money, and works better than anything I've ever bought from the store! You really only need to use it once a day and it is supposed to remove make up too(I wasn't wearing any so I can't weigh in on that). I even crocheted a cotton washcloth last night to use with it! It was so cool to be using a face wash I made in 5 minutes on a washcloth I made in 20 minutes and LOVE the results!
You must try it, if you don't like it you can always go back to your regular stuff, but I don't think you will want to!
Also I added a subscribe by email gadget, so you can receive updates automatically by email instead of checking in. Just fill in your email and click submit!
Thursday, March 17, 2011
WW Challenges!
I've joined 2 challenge groups on WW. The first one is a 5lb Challenge. Basically after each 5lbs you lose, you treat yourself to something non-food related, for instance a manicure or pedicure. I'm not sure what I'll pick to be my reward, I'm sure I won't be able to afford a pedicure or manicure at each 5lbs but I just might, especially if I stay at this 5lb/month rate. I am getting my hair trimmed, with a slight change in my style on Monday so I will use that as my first 5lb reward!
The second challenge I'm doing is a 30 Day Activity Challenge. Basically the challenge is that you do some sort of workout activity each day for 30 days. This challenge started yesterday and luckily I had walked a mile after lunch anyway, so I'm not behind. I will try to post weekly updates for the activity challenge for the month that it lasts.
P.S. In case you are concerned that my new easter inspired background of jelly beans will lead me into temptation and hinder all WW efforts, you can rest assured because I'm not really a jelly bean fan(unless they are the starburst kind, although even then I'd rather have the real starburst.) So my point is, seeing jelly beans everyday when I look at my blog does not even remotely make me hungry for jelly beans, which if they did I could still have by the way.
Tuesday, March 15, 2011
Weight Watchers 1 Month Photo
Monthly Weight Loss: 5lbs
Total Weight Loss: 5lbs
Monthly Measurements: No Change
Total Measurements: No Change
Total Weight Loss: 5lbs
Monthly Measurements: No Change
Total Measurements: No Change
Monday, March 14, 2011
WW Week 4 Update!
Wow I can hardly believe it's been a whole month since I started Weight Watchers! I've lost 3lbs at my weigh in this morning! YAY!!! I'm glad I was able to make up for last weeks gain, and lose some on top of that. My goal this week is to pump up the workouts. Workout at least 4 days and do it for a longer period at each session. Hopefully that will improve my successes!
P.S. I will try to post 1 month pictures and measurement updates later in the week.
Grasshopper Fudge Cake
I couldn't get the photo to work, but you can find the recipe here. Just search for Grasshopper Fudge Cake. I'll post the recipe here too!
1 box Betty Crocker SuperMoist white cake mix
1 1/4 cups water
1/3 cup vegetable oil
2 tsp mint extract
3 egg whites
12 drops green food color
2 jars(16oz each) hot fudge topping
1 container (8oz) frozen whipped topping, thawed
5 drops yellow food color
Thin rectangular candies, unwrapped & cut into pieces
1. Heat oven to 350•F for shiny metal or glass pan (or 325•F for dark or nonstick pan). Spray bottom only of 13x9-inch pan with baking spray with flour. (I used regular cooking spray and it was fine)
2. Make cake mix as directed on box, using water, oil, 1 1/2 teaspoons of the mint extract and the egg whites(the box said 4 egg whites, not 3 so I made it according to the box). Reserve 1 cup of batter; set aside. Pour remaining batter into pan.
3. Drop green batter by generous tablespoonfuls randomly in 12 to 14 mounds onto batter in pan. Cut through batters with metal spatula or knife in S-shaped curves in one continuous motion. Turn pan 1/4 turn; repeat for swirled design.
4. Bake 28 to 33 minutes or until toothpick inserted in center comes out clean. Run knife around side of pan to loosen cake. Cool completely, about 1 hour.
5. Carefully spread fudge topping evenly over cake(I had 2 12oz jars and only used 1 1/2 jars and it was plenty). In medium bowl, stir whipped topping, remaining 1/2 tsp extract, remaining 9 drops green food color and the yellow food color until blended. Spread whipped topping mixture evenly over fudge. Garnish with candy pieces. Store covered in refrigerator.
It was soo good and perfect for St. Patrick's Day! Enjoy!
Saturday, March 12, 2011
The winner of the giveaway is.....
AubreyLaine! Congratulations on winning the $15 CSN Stores Gift Code! I will email you the code later today! Have fun shopping!!!!
P.S. I used http://www.random.org/ to pick the winning comment and it picked #5 Aubrey!
Tuesday, March 8, 2011
WW Week 3 Update
So I gained back the pound I lost week :( Saturday wasn't good point wise at all. I know I didn't drink enough Sunday, and that makes a difference for me. I'm hoping that by working extra hard this week I can make up for it and then some! I'm still down total, so I'm just trying to focus on that and use that 1 pound as an extra motivator!
Friday, March 4, 2011
Grasshopper Fudge Cake and My First GIVEAWAY!!!!!
I found a recipe that I can't wait to try! I'm going to make it this weekend when my sister comes to visit! Grasshopper Fudge Cake, how good does that sound? It's a green, chocolate, mint cake, perfect for St. Patrick's Day! I know what you're all thinking "isn't she on a diet?" well, not really, I'm watching what I eat and eating healthier, but that doesn't mean I can't have cake (or anything else I want). I'm not a big cake eater anyway so I'll have no problems just eating one piece. I have plans for the leftovers, so that they are not sitting around the house anyway. After I make it I will post pictures and the recipe so you all can try it too! I picked up all of the ingredients (except the Andes mints for the top) today, and made sure my pan set wasn't dirty, so I'm ready to go! YUM I can hardly wait to try it, well I hope it's as good as I'm anticipating, but seriously how can you go wrong with chocolate and mint?
Now on to part two of my post! I'm going to be doing my first giveaway! The prize is a $15 gift card code for CSN STORES. They have over 200 stores, literally something for EVERYONE. Contest ends Friday, March 11, 2011 and I will randomly pick and post the winner Saturday, March 12!
Here are the rules to be entered in the drawing:
1. Become a follower of my blog.
2. Leave a comment on THIS post, letting me know you are a follower and what you'd like to do with the gift card! (If you already are a follower, just enter with a comment.)
I can't wait to hear what all of you would do with the gift card!
Subscribe to:
Posts (Atom)